Seapearl Caseback Removal Tool

Joe_A

Moderator
Staff member
Enicaristi
Sherpa
Steve,

I had one of those made "just in case," though I have no need of one . . . yet.

The fellow who drew these up is named Steve Foskett and I had some discussion with him via FB and over at WUS. He volunteered to draw up and print for the larger size, Seapearl 300, but this project never materialized. Perhaps another nudge would do it one day?

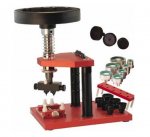
I am sure he got busy with other things and it may have been more work than he envisaged. I'm not 100% sure that a plastic tool would work for the 40+ mm case. I could not open my Mark Id case with the brass tool that RGM made for me until I added a handle for leverage. RGM uses the die with one of those case presses something like this:
 

Attachments

  • Snap3.jpg
    Snap3.jpg
    40.8 KB · Views: 13

Joe_A

Moderator
Staff member
Enicaristi
Sherpa
I don't know whether you have ever worked with Shapeways, Steve, but they will print 3D objects with high metallic content metals filaments, such as bronze. See here:

Shapeways Steel - 60% stainless; 40% bronze

My thought would be to print something inexpensively first in say, PLA, and then after confirming applicability, spend the extra money on a final product in metal.

Every now and then I get the urge to learn how to work with one of the 3D modeling software packages, but then I get a bit overwhelmed trying to decide which or the many would be the right one for me . . . and then work and other aspects of life cause the urge to fade. :)

Edit: fixed typos . . . I think. ;)
 
Last edited:

martink

New member
Sherpa
Hi,

I would leave it in cheap material like PLA, maybe notch it up to ABS - there should not be the need for more.
And the advantage is that these plastic grades would never damage the case back, whatever one would try to do ;-)

I work with FreeCad usually. And while it is not stable all the time, at least it is free.

What case backs would be the most needed ones?
Maybe I could help with designing one tool.

On the other hand, the "Chinese rubber ball" is the cheapest and usually a very effective tool.

Best regards,

Martin
 

Joe_A

Moderator
Staff member
Enicaristi
Sherpa
Welcome Martin and thank you for your comments.

I have two Sherpa Graphs, the first of which was received by me a couple of years ago with a typically abused case back and that one, I can open with a rubber ball.

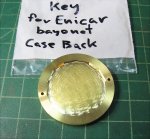
The second S.G. is challenging to open by hand even with the 14-sided CNC-milled brass opening tool made by RGM that looks like this:

EPSA-ESG-Case-Tool-RGM.jpg

The drilled holes are intended to accommodate a case opening "press" like the one shown above in my July, 2019 post. The press applies downward pressure and prevents the tool from slipping off the watch case back.

Here is another shot with the handle I added:

RGM-EPSA-Tool-with-JPA-Handle-2.jpg

Absent a press to keep the tool from slipping off and damaging the case, one must be very careful as the full length of the handle is needed to apply enough leverage to loose the case and one must apply downward pressure on the tool itself.

Both watches have a wave spring within, yet one case is orders of magnitude tighter than the other.

A resin tool will not cause damage if it slips off, but it is more likely to slip off than a well-made metal tool.

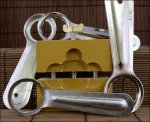
Apparently, the original tools looked like these:

2558227_orig.jpg

Rather crude, but effective I suppose.

It's even possible and perhaps likely that some of the scratches we see today were made by the tool above when not handled with care - perhaps not putting sufficient downward pressure on the tool as it sits over the case back.
 

Attachments

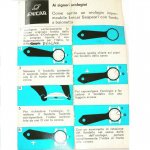
  • EPSA Open-Close-Italian.jpg
    EPSA Open-Close-Italian.jpg
    98.2 KB · Views: 26

jbcollier

Member
Enicaristi
Sherpa
I have one of the stamped-metal tools shown just above. It works on most of my compressor Enicars except the Mini-Dives, turtle-cased divers and a small no-date Sherpa. I was surprised the same tool worked on so many of them.
 

martink

New member
Sherpa
Dear Steve and JbCollier,

I have also one of the above tools, but I find it less comfortable to use than the rubber ball.
Regarding the "tightness" might also be a topic of size of the O-ring sealing between case back and case, and how well it is lubricated with silicone.

In general, EPSA had several geometries for these "flower" shaped tool interfaces.
Different numbers of "teeth" (10 and 14) and different radii.
I found the documentation somewhere in Switzerland and theoretically I could re-design different sizes if necessary.
But currently I am busy with another project...

Most scratches on the case backs come from standard tool geometries being tried with the Enicar/EPSA case backs and slipping off.

Steve, in the end, the most secure method is with a fixed case opener / closer shown in Joe's post, which cannot vary in height while turning the case back.

Which tool geometries would be needed most?

Cheers,

Martin
 

SteveHarris

Administrator
Staff member
Enicaristi
Sherpa
Hey Martin. Good to see you here :)

I think the one most people have trouble with are the Graph cases. They are nearly always the most abused casebacks I see anyway.

Recently I had to resort to super gluing a nut on to the back of a caseback and then using a spanner as leverage. This worked beautifully and a short dunk in acetone cleared the glue with no damage or marks to the caseback at all (it was a NOS caseback too, so I was very careful!). I obviously cleaned the caseback thoroughly afterwards. The real trick was to super glue it and once dry, warm it all up on the top of a radiator for a few minutes before attempting to open.
 

martink

New member
Sherpa
Steve!

Wow. You have courage - this is not for the faint of heart.
I think I would not dare this.

So, what was the reason it got stuck so hard? A "molten" sealing?
Or is it like this all the time?

Cheers,

Martin

P.S.: yes, it is nice to be here finally.
Took me quite a while, but I was busy with other things... ;-)

P.P.S.: can you tell me the geometry data of the Graph case backs?
I would be willing to attempt a tool geometry.
I do have the drawing of the available tool geometries, so I just need to know which one to choose.
So, I would need the distance from one "tooth" to the opposite "tooth" and to double check also the distance from the nearest distance opposing each other (the concave part of the "teeth").

all the best, great forum here!

Martin
 

JimJupiter

Moderator
Staff member
Enicaristi
Sherpa
@martink I use an opener like Joe showed with the markins "16 14" P for my Graphs, wheras the "4 14 PC" is my Enicar allround opener.

Nico
 

martink

New member
Sherpa
@martink I use an opener like Joe showed with the markins "16 14" P for my Graphs, wheras the "4 14 PC" is my Enicar allround opener.

Nico
Dear Nico,

interesting. The only drawing that I find that uses 16 14 would be without concave tool geometry, just straight ones.
The concave ones (which would be typical for Enicar Sherpas) end at 7 14.
Then I would need measurements.
Sorry that I don't own a Graph! Very bad omission on my part ;-)

Martin
 

JimJupiter

Moderator
Staff member
Enicaristi
Sherpa
Your drawings are correct. its not a perfect 1:1 fit, like the 4 14 PC on the other Enicars. But it does its job :)

edit: but the edges on the graphs are straight, not concave like on the Super Dives etc.
 

martink

New member
Sherpa
Ah,

this explains quite a bit!
So, this 16 14 is the biggest tool diameter Enicar had for both - concave and straight.
It is basically a straight 4 14.
 

Joe_A

Moderator
Staff member
Enicaristi
Sherpa
I'm curious about the drawings being discussed.

I understand the "14" is the number of sides in each case, but the "4" and the "16" refer to . . . what?

Are these known or extant drawings?

Regards,

Joe
 

martink

New member
Sherpa
I'm curious about the drawings being discussed.

I understand the "14" is the number of sides in each case, but the "4" and the "16" refer to . . . what?

Are these known or extant drawings?

Regards,

Joe
Hi Joe,

basically it is like this:
The 14 is the number of sides, as you said.
And the 4 and 16 are simply the number of the line in the spreadsheet/table where they are listed :)
Quite simple.
For the concave ones, this ends at 7, but the last one actively used was the 4.
For the straight ones, the table ends at 16.

In the given line one can find the diameters etc.

I would say that these drawings are not known. I have never seen them anywhere before or after.
Even though they did standardise these tool surfaces in the Swiss watch industry in the 50s/60s.

I found them in one Swiss archive somewhere, after a lot of digging.

Cheers

Martin
 

SteveHarris

Administrator
Staff member
Enicaristi
Sherpa
That's super interesting, thanks for sharing that Martin.

The super glue and bolt method is pretty safe. There's nothing to go wrong really, you just need to be careful when placing the bolt initially.

So, what was the reason it got stuck so hard? A "molten" sealing?
Or is it like this all the time?

This was exactly it. The gasket had basically broken down in to a goo. Not nice and took a good while to clean off properly!
 
Top